You're driver #[an error occurred while processing this directive] to make this road-trip since 8/3/01
MOPAR Mania II
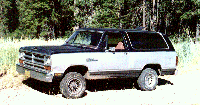
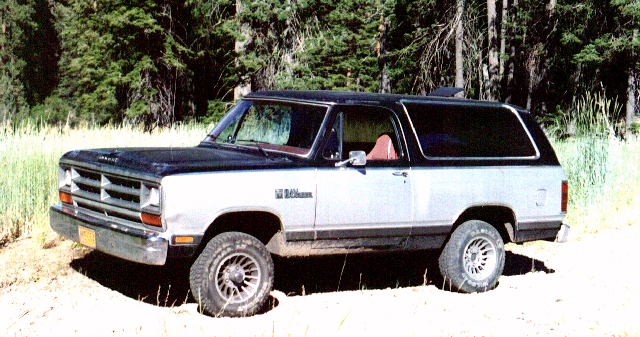
1986 Dodge Ramcharger
Engine: 5.2 liter (318 ci) V-8
Transmission: 3-speed automatic; 3-range transfer case
Sold: 2004
|
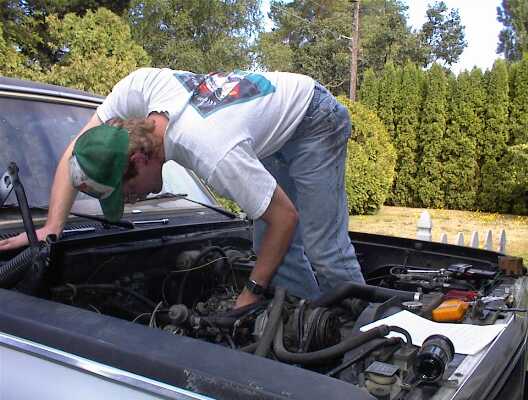
Failing to learn my lesson from the Rabbit, in 1995 I once again bought a
vehicle from a coworker.

The Ramcharger was leaking copious amounts of oil when I bought it, but for
$1500 vs. a bluebook value of $3500, it seemed like a good deal. And it has been: $35 and a few hours' work corrected the oil leak from the rear of the intake
manifold. (The rear intake gasket had been installed incorrectly, either at the
factory or by the previous owner's mechanic.) The interior of this engine was
the dirtiest I've ever seen, with lots of oil sludge that looked about
like mud. I kid you not: There were pine needles in the cam valley.
(OK, technically they were spruce needles, but still!)
If I had to describe the Dodge, I'd say "tough but plush." It's got power
everything, air conditioning, and even one of them newfangled cruise-control
things.
The first major trouble with the Ram came about a year after I bought it: The
truck ate its timing chain.
|
The second problem was a five-car pileup on Interstate 5, just north of
Wilsonville:
A lady two cars in front of me just had to try out the antilock brakes
on her brand-new FORD Explorer. The Toyota in front of me hit her. I
managed to get the Dodge stopped (5000 pounds from 50 to 0 mph) with about three
inches to spare. I just barely had time to think "Shit, that was close!" when I looked in the
rearview to see the FORD F-250 pile into the back of the Dodge with an
assist from the light truck behind him. Well, the Dodge stood up pretty well,
but the five inches of forward motion busted the tail lights of the Celica in
front of me. I HATE FORDS!!
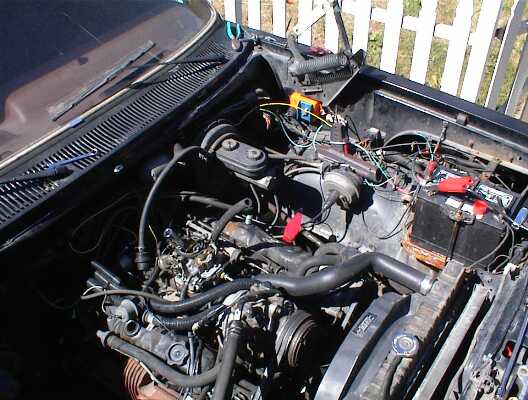
The Great Dodge Rebuild
She stripped her gears only late last night,
I don't think that thing was oiling right.
-- ZZ Top, "I Wanna Drive you Home"
In February of '98 the Dodge started making some disconcerting noises while on
a ski trip about 180 miles from home. I didn't call it to the attention of
my passengers, not wanting to worry them and confident that the Ram would make
it back. The trip was successful, but when I dug into the truck's motor I found
that it had indeed given it's all: The #1 exhaust pushrod had been punched clean
through the rocker. I don't think that's supposed to happen!
I replaced the rocker shaft, which had been worn almost through, two rockers, and three pushrods. I resurfaced the #1 exhaust valve stem, knowing that it was
only a temporary fix, and crossed my fingers. In June '98 things started to
come apart again. I had the Dodge towed three times in two months and decided
that it was time to park it.
After checking into prices for rebuilt long-blocks, I came to the conclusion
that it would be much cheaper to rebuild the Ram's 318 myself.
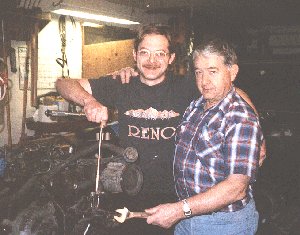
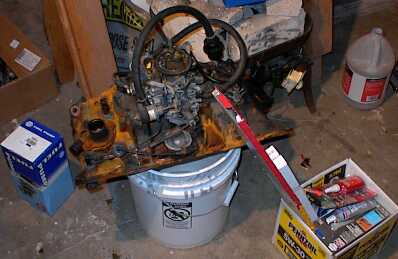
The folks were up for Christmas, and Dad helped me pull the engine.
Dad was right: The radiator panel does come out, and it makes a
difference of about three feet of lift on the cherrypicker.
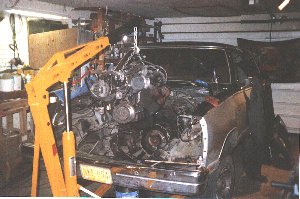
Hey! There's a lot more room in here without the mill... .
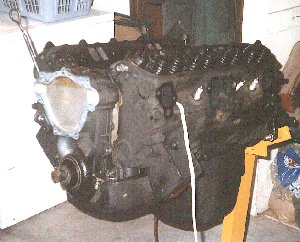
The long block just prior to removing the heads. (I call this The
SOL Rope Trick, since I learned it on the
British Cars Mailing List
-- feed about three feet of light rope through a
spark plug hole, then turn
the crank and the head pops right off. Oh -- remove the head bolts
first... .)
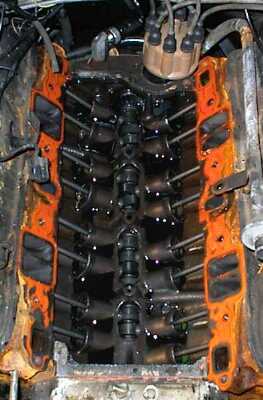
As of New Year's Eve 1998 the engine has been stripped to the short-block. I've found
three bent pushrods; the timing chain's stretched; several lifters are shot;
I'm sure it's time for a new cam.
There's a lot of work and a modicum of expense ahead, but damn it, the Dodge
is my dog's favorite truck!
1/1/99 -- The engine is stripped to the block now, and here's what I've found even without
making any measurements:
- Bent pushrods (4i, 5e, 6e, 8i)
- Worn-out lifters (some visibly concave)
- Cam lobes worn through the hardened surface (at least a quarter of 'em)
- Scored con-rod bearings
- Scored cylinder walls
- Stretched timing chain (from the extra load of bent pushrods?), and it was only two years old!
I couldn't get even one of the lifters out through the top of
its bore: I had to take 'em out the bottom after removing the
camshaft.
1/6/99 -- It's down to the bare block: Ridges reamed, crank and
pistons removed. Now where am I gonna find a set of calipers and a
telescoping gauge that'll accommodate 4" diameter pistons and cylinders?
The heads are disassembled too. All the valves except 1e (as noted
above) seem to be in decent shape. Here are some more problems:
- Main bearings scored
- Crank scored (but that can probably be ground)
- All exhaust valve seals disintegrated
I'm starting to think that it might be cheaper to buy a long block
instead of doing the rebuild myself, although at $1200 for a long block
I'm still not sure. (And I'd rather practice on the Dodge than the
Plymouth.)
1/11/99 -- Not much forward progress
since the last entry, as I'm waiting for a set of big micrometers to
come in at the local tool store. But, I think I've identified the root of
the trouble: As I was halfway expecting, the oil pump is shot. (Since
I've owned it, the oil pressure has never run higher than about
20psi.)
Not only are they out of tolerance by a minimum of .004 inches in every
dimension except the outer-rotor-to-housing clearance, but the meshing
faces of the rotors look like someone (a very small someone) has been
pounding on them with a hammer. There have been a lot of fairly hard,
fairly large particles ground up in this pump over the years. Another
indicator is the oil pump drive shaft: The leading edges of the hex are
obviously well-worn.
So far the only things I'm sure I don't need to replace are the
valve-spring keepers... .
1/20/99 -- The block and heads from the real truck are
currently in the back of the toy truck: They're headed down to S H
Racing tomorrow for hot-tanking, R&R of cam bearings, boring (if
necessary) and honing. Gotta ask 'em about milling the deck if
required... .
At the moment the plan is to buy a master rebuild kit (includes
pistons, cam, crank, etc.), have the machine shop deal with the block,
and bolt everything back together. Bottom line appears to be about
$1100. Not much less than a rebuilt long block, but I'll know what's
been done to it, and the components are almost certainly higher quality.
1/22/99 -- Took the block and heads in to the machine shop
yesterday; had to go back in today to give 'em the main-bearing caps: I
didn't realize that they needed 'em, but I was told that they have to
install them and torque 'em down in order to bore the cylinders
accurately. I wouldn't have thought that five relatively small chunks
of cast iron would create that much distortion in a much, much larger
lump. You learn something every day. (And I wonder whether just any
place would worry about it.)

Putting the engine from the real
truck into the toy truck.
I have a good feeling about this shop, S H Racing and Development, in West
Slope: Not only do they do work on aircraft engines and airframe
components, which they wouldn't be doing if they screwed up very often,
but the gent who took custody of my parts came to the counter wearing
surgical gloves. (Sure, I wear 'em too, when I'm working with
particulary dirty parts or nasty solvents, but at least they have the
desire to keep something in their shop clean, even if it's just their own
hands.)
I pressed a couple of wrist pins out tonight to see how they looked and
to get the R&R (remove and replace) tooling worked out in anticipation of
installing the rods in new pistons. I was relieved to find that the
piston rods and pins are in good shape: There's a bit of discoloration
near the mating flanges of the rod bearing castings where there must've been
enough play for oil to get behind the shells, but I can still plainly
see the hone marks, and thank God none of the shells spun!
If I get my wish, S H will tell me that boring isn't necessary: That
would knock about $100 off the bill, and mean that I could use
standard-sized pistons and rings.
While my engine is in the shop I volunteered to fix my sister's warped
head. (Well, at least the warped head from her truck).
Sorry Dodger, you won't be riding in either of these trucks for awhile!
| 
The rebuilt Toyota 20R head
on Sis' truck. |
2/11/99 -- Called the shop to check on progress: They've
hot-tanked everything, and magnafluxed the heads (checked out OK); they
should be able to check out the block early next week, then I can start
spending money on parts.
2/19/99 -- S H Racing says that the cylinders do need to be
rebored. They weren't sure that .020 over would be enough, so I told
them to go ahead and take it to .030 over. That will give me a total
displacement of 322.8 c.i. With an RV cam (and a lot less internal
friction from worn-out bearings) I should notice an increase in power.
The shop also advised me to have the valve guides bored and sleeved, so
I told 'em to go ahead.
Since I now know the bore dimensions, I was able to order the master rebuild
kit and a new crankshaft. They should be in early next week, and S H
Racing should be finished with their work late next week... I might be
able to start the re-assembly process next weekend!
2/23/99 -- Well, my wallet's lighter... . Picked up the master
rebuild kit and crankshaft tonight: $688.10, not including core
charges.
Cha-Ching!!
But, that included a higher-performance camshaft, .050 lift, 204 intake,
214 exhaust; stiffer springs to go with it; a high-volume oil pump; and a new
oil-pump drive shaft, gear, and bushing. I have to thank Damon at
Beaverton Auto Parts for giving me dealer pricing, otherwise the cost
would've been over $1K. (Now if I can work it so they'll open me an
account and credit the crankshaft core charge to it, maybe their computer
will tag me with dealer prices from now on... that'd be cool!)
Now all I have to do is get various parts up to S H for final fitting
and installation, and get Sis' Toyota out of my garage... .
3/6/99 -- Sis picked up her Toyota. She says it sounds the same as it did before, which
is a real relief for me: I was afraid that there was still an exhaust leak (though I couldn't find
one), or that I had the timing set too far back. I guess the odd (to me) sound must be from the
aftermarket exhaust system.
Since her truck was in the garage anyhow, I also fixed the tachometer, fabricated a new radio antenna,
a new heater-control lever, a new battery hold-down bracket, and a new contact-ring wiper for the horn
buttons. Probably other stuff that I've forgotten about, too.
For my efforts I was rewarded with a bottle of The MacAllan 12,
possibly the world's finest Scotch -- $45 a fifth around these parts. Thanks Sis!
3/12/99 -- Finally got the pieces back from S H. Now the fun begins!
3/14/99 -- I shouldn't have done this until the end, but I was afraid I'd lose the paperwork.
I started adding up what all this is costing:
| Item | Cost | Subtotal | Vendor |
|---|
| motor mounts | 22.48 | 22.48 | G.I. Joes |
| block+head refurbish | 210.00 | | S H Racing |
| balance assembly | 160.00 | | S H Racing |
| check rods | 24.00 | | S H Racing |
| install pistons on rods | 48.00 | | S H Racing |
| valve grind | 115.00 | | S H Racing |
| surface decks | 70.00 | | S H Racing |
| R&R guides | 144.00 | | S H Racing |
| 9960H replacement guides | 32.00 | | S H Racing |
| 1 new exhaust valve (#1) | 10.25 | | S H Racing |
| R&R exhaust seat + seat | 14.00 | | S H Racing |
| valve stem seal set | 32.00 | | S H Racing |
| 4 soft plugs (heads) | 1.00 | | S H Racing |
| remove 2 ex studs; inst. helicoil | 20.00 | | S H Racing |
| install distributor drive bushing | 4.60 | 884.85 | S H Racing |
| master rebuild kit | 371.00 | | BAP |
| reground crankshaft | 134.00 | | BAP |
| delete stock cam | -63.91 | | BAP |
| add RV cam | 137.94 | | BAP |
| delete stock rod bearings | -25.20 | | BAP |
| delete stock main bearings | -39.21 | | BAP |
| add double valve springs | 72.80 | | BAP |
| add double valve-spring retainers | 59.04 | | BAP |
| delete stock oil pump | -21.08 | | BAP |
| add high-performance oil pump | 41.08 | | BAP |
| distributor drive shaft | 22.19 | | BAP |
| return piston bushings | -10.80 | | BAP |
| return single-row timing set | -26.32 | | BAP |
| 16 pushrods | 38.88 | | BAP |
| flex-plate bolts | 18.35 | 708.76 | BAP |
| double-roller timing set | 60.45 | 60.45 | Baxter Auto Parts |
| Total | | 1,676.54 | |
Ouch! I could've gotten a rebuilt long-block for about $1,200... . (Note that while I was credited for the
stock rod and main bearings, I was never charged for the undersize shells. Gee, too bad!)
Today begins the reassembly process, starting with a thorough washing of the block before installing the
freeze plugs. Stay tuned... .
3/23/99 -- Trouble in paradise? The engine is reassembled to
the long block and beyond with no problems until this evening: Everything went
fine until it came to mounting the bracketry for the various belt-driven
accessories.... I've got plenty of pictures of the mill coming out of the
truck -- missing the steering pump and air-conditioning compressor. Why
didn't I take any photos of the thing before I started unbolting things?
Damn!
Problem #2: I took it into my head to fabricate a driveshaft and
spin up the oil pump. (Hadn't planned to do so until the motor was
bolted in. Turns out oil is pouring out of the oil-filter
adapter... apparently I left out a gasket. Double damn!
Well, there's always tomorrow... .
4/1/99 -- It runs like a champ! (April Fool!) It just dawned on me this
evening that I've spent more on the
engine than I paid for the entire truck. At least I didn't have to call Hillsboro
Towing again... would've been embarrassing to have their flatbed driver show up:
At this point I wouldn't even have to say a word, he'd know the way to the house.
Let me back up: The motor really does run well. If you ever do a rebuild I heartily
recommend having the mill balanced. Remember that Cadillac commercial where they stacked
a bunch of champagne glasses on the hood and ran the car up to 80 on a dyno? It's that smooth!
Or was it an Infiniti ad... doesn't matter: The Dodge's engine just runs nice!
Play a video of the intitial startup
(AVI format, could take over five minutes to load at 28,800 bps)
The problem is this Goddamnit-to-Hell electronic ignition! With the '70 Plymouth
everything's straightforward: The timing mark is either running on the mechanical advance or the
vacuum capsule. Plug the vacuum hose and you get the real ignition timing. Simple.
With the '86 Dodge, there are at least five different sending units running to the "Spark Control
Computer." What happens in there, who knows? I've checked the valve timing three times now, and TDC
on the harmonic balancer coincides with TDC of the #1 piston within 1/1000 of an inch -- I checked that
with a dial gauge; The reluctor and rotor in the distributor line up with the #1 spark plug wire just
as they should, but I have to advance the dist about ten degrees before it'll run. Checking with a timing
light when it's just cranking over on the starter, I can't even see the timing mark on the balancer, but
when it's running it's at least in the range -- idles best at about 10 degrees BTDC. It'll idle or rev with
no load for 20 minutes, but as I found tonight, under real load it dies after about 1-1/2 minutes. Damn!
Could it be the fuel pump? I just put a new one on about... (checks records)... about four
years ago. (Although, according to my records, that was the last time I replaced the fuel
filter, too. I'd better check the filter itself: I always mark 'em with the installation
date.) Later: As I suspected, I replaced the fool filter on 7/9/98. Could still be the pump, I guess,
or possibly the 1/2-tank of gas that's been sitting for seven months.
4/18/99 -- First time in awhile I've gotten around to updating
this. In keeping with the delay, I've put together a slide show of
reassembling the engine.
In our last thrilling episode, I'd decided that the Dodge had a
fuel-supply problem. In this order, I: Replaced the pump and filter;
rebuilt the carburetor; removed, drained, power-washed, and reinstalled
the fuel tank. Didn't make a bit of difference.
Finally, on Thursday night, I got fed up with fooling around: I pulled the
distributor, coil, and ballast resistor out of the
Plymouth, and jury-rigged them into the electrical
system. (Mechanically they're a direct swap.) With that done, the
engine would fire and run... but only while the starter was turning.
Discouraged, I went to bed.
Friday evening it finally dawned on me: I'd connected the ballast
resistor to what seemed to be the proper terminal of the starter relay,
but I was interpolating between the Plymouth's wiring diagram and diagrams
of two different configurations for the Dodge (one with SCC ignition and
one with ECU). I guessed wrong.
With the coil hooked to a permanently hot wire through the ballast
resistor, it fired right up! (Of course I had to cut the wire to make
it stop.)
The moral of the story: MOPAR Spark-Control Computer ignition systems
suck! Granted, the engine did need to be rebuilt, but there was nothing
so mechanically wrong that it stopped running: Something's wrong with
the SCC or one or more of its zillion sensors.
I'm tempted to install an aftermarket ignition system, but I don't know
whether the DEQ would fail the truck on its smog check for non-original
equipment. A safer option would be to install an ECU ignition system,
since it was also used in '86.
Before spending more money though, I should run through all the vacuum
hoses -- there are at least a dozen -- because a broken one could
be causing the SCC to receive false data. Or it could be a faulty
electric sensor -- of which there are about six -- that initially had
thermal problems and is now completely dead. What a pain!
I guess I could just throw the SCC gear in the back seat, drive it to
the dealer, and tell them: "Fix it!"
9/12/99 -- Finally, progress!
I broke down and ordered an electronic ignition "upgrade" kit from
Summit Racing. (I suppose that technically it's a "downgrade" from the
SCC engine-management system, as it's intended to replace old
mechanical-style ignition systems, but if it makes a nonfunctional
vehicle work, I'll call it an upgrade!)
Here are a couple snaps of the installation process:
Working on the distributor and vacuum-advance connections. Gee this is
fun... .
The new ignition system in place. The MOPAR "orange box" ECU is
installed just below the left hood strut.
I messed with this thing for about six hours without success. Turned
out that I'd burned up a coil in the starter, or possibly the solenoid
while cranking the engine back when it was acting up. This weekend I
installed a new starter, and damme if it didn't fire right up!
Unfortunately, or maybe not, it was about 30 minutes after the DEQ
emissions station closed for the day. It idles and runs well without a
real load on it, but I need to go out and get an adjustable timing light
and a better tach-meter to really get the new distributor's vacuum
advance dialed in.
I'm close though: I can feel it!
9-20-99 -- Fired up the Dodge and motored it up to the DEQ for
emissions testing and
registration renewal today, since tomorrow's the last day on the
temporary permit. Everything seemed fine and I had moderate
hopes of passing the test (the new ignition's still not dialed in quite
right, and I suspect it'll read high on hydrocarbons until the new rings
are seated). Anyhow, I pulled up to the test station and left 'er
stitting there running and went into the waiting room while they
finished the
dyno test on the Saab in front of me. I was just thinking about how it
probably won't pass until I replace the rockers and get a steady vacuum
reading, when the DEQ guy busted through the door and said "your truck's
really leaking oil bad, you'll have to get it out of here!"
Aieeee!
At first I thought the new rear main seal had let go, the worst-case
scenario, since replacing it means at least partially pulling the
engine, but I eventually
concluded that it's either leaking around the (new) distributor, or from
a plug I put in place of the oil-pressure sender while I diddled with
the vacuum-advance adjustments. Safe money is on the plug, since I
fabricated
the thing in about five minutes. (But it's brazed together, and the
engine
shouldn't get hot enough to melt that... .)
Anyhow, it was a long 2-1/2 miles home, with stops to pour in about two
quarts of oil... . I had visions of about $300 worth of bearings being
chewed to Hell with less than 48 hours of accumulated run-time on 'em... .
11-27-99 -- It's getting uncomfortably close to a year now since I started working
on this thing... .
I finally concluded that the oil leak must be coming from the rear intake manifold gasket. Either
that or the even-side head gasket, but I don't think it's that. I'm betting my money (well,
nine bucks' worth) that the intake manifold was poorly sealed at the rear even-side corner. And, as
long as I'm tearing into it anyhow, I decided to replace the rocker arms and shafts -- the last
moving parts I hadn't replaced already -- in hopes of getting a steady vacuum reading.
Here's the updated financial report:
| Item | Cost | Subtotal | Vendor |
|---|
| balance forward | | 1,676.54 | |
| ignition upgrade kit | 178.90 | | Summit Racing |
| starter | 29.99 | | Knecht's |
| left rocker arms | 47.92 | | BAP |
| right rocker arms | 43.92 | | BAP |
| rocker shaft | 42.98 | | BAP |
| intake gasket set | 8.89 | | BAP |
| fuel pump | 21.99 | 374.59 | BAP |
| Total | | 2051.13 | |
(The fuel pump is incidental: I tweaked the one that's currently installed with a socket
extension while I was torquing a bolt, and I can hear what sounds an awful lot like a spring
hanging up then popping free with the stethescope. Not something that I want to have give
way on the road.)
The rockers I should've replaced anyway, as they're all worn, and the odd-side shaft and
several arms are from a junkyard.
Here's why I should've painted the engine parts:
But who knew that it'd be sitting in the rain for several months without the hood on it?
After pulling the manifold I've come to the conclusion that my oil leak and vacuum problems
might come from the same source: When I installed the intake manifold, my manuals disagreed
whether to use sealer on the side gaskets. Foolishly, I went ahead and used RTV. I now
think this was a mistake.
If you look closely at this picture you might notice that the RTV around the intake ports
looks odd. In fact, it really wasn't adhered at all, especially between the siamesed ports.
Crosstalk between the intakes would definitely make the vacuum readings wonky!
When I examined the old gaskets, I found that the ridges of wrung metal had been only slightly
crushed at best. It looks like the RTV filled them in and prevented the gaskets from
compressing properly.
At least the new gasket set came with an instruction sheet, which is more than I got
with the full-rebuild set. One note of interest in these instructions is:
DO NOT use any sealer on side gaskets.
Well, there you go... . We'll soon see how it works out this time. (It sure is a helluva
lot easier to work on the engine when it's out of the truck though: Oh, my achin' back!)
5/29/01 It's been awhile... . I was hung up with a project at work
for a year or so, and having the Nissan available
wasn't a motivating factor to work on the Ram. I've gone 'round and 'round
with the ignition system and the vacuum system, and just about two days ago found a vacuum line to the evaporative emissions charcoal cannister with a good-
sized hole worn in it. That might be something... . At present I've switched
back to the SCC, thinking that I haven't tried it since resealing the intake
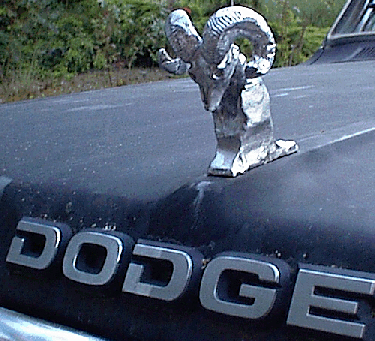
manifold... . Had to take a break tonight and install a Beta version of the new
hood ornament:
(PREVIOUS)
(UP)
(NEXT)
[TO MY BIO]
[TO MY HOME PAGE]